Disclaimer – this post is sure to weigh in on what is the most controversial topic since “what’s the best handlebar width“. The views contained below are solely that of the author… and not necessarily the views of RVC. Following this post I may have my website rights revoked. We’ll see. Let’s begin.
Tire pressure can be a perplexing thing for new fat bike riders. Often the bikes come from the shop or rental locations with the tires pumped up as hard as a rock – leading to a harsh ride. If you remember nothing else from this entire article just try riding at 5.5 PSI. However, there’s a lot more to tell.
Fat bikes are all about increasing the surface area of the tire in contact with the trail. This is known as ‘contact patch’. While your rim profile and tire width greatly influence ‘contact patch’ you can’t easily change those things. What you can change is air pressure… and that makes a big difference quickly. Lowering your pressure increases contact patch since your tire can deform to the shape of the trail. Increasing your pressure decreases contact patch and your tire becomes more firm, and less deformed by interaction with the trail. Contact patch area helps create traction on loose and slippery surfaces and it creates flotation in marginal conditions. A tire able to deform around small objects also creates a smoother ride. On the other hand, a big contact patch also increases rolling resistance, and in extreme cases it creates something called ‘self steering’ on hard surfaces (a disconnect between where you point your handlebars and where the bike goes). A tire with tubes that has too little pressure is also at a higher risk of a trailside pinch flat – and that is especially awful with a fat bike.

So with that theory behind us – start by filling up your tire to 5.5 psi and give it a test. Place your palm on the top of the tire and apply ~1/2 of your body weight to it. The tire should deform in your hand and you should see it bulge on the floor. If the tire folds over on itself or you feel the rim coming into contact with the floor you need to add air. If the tire barely deforms with ~1/2 of your body weight you need to let air out. Generally speaking heavier riders are going to need higher pressures to achieve the same contact patch. Use this method to find your starting point. You can also transform this into the ‘pinch test’ to achieve about the same results. Don’t be shy… pinch hard!
It’s much easier to let a little air out of your tires on the trail than it is to put air back in. Although there are high-volume hand pumps available for fatbikes there is still a lot of internal space to fill and pumping up tires takes time with the best pumps.
When might you want to let a little air out on the trail?
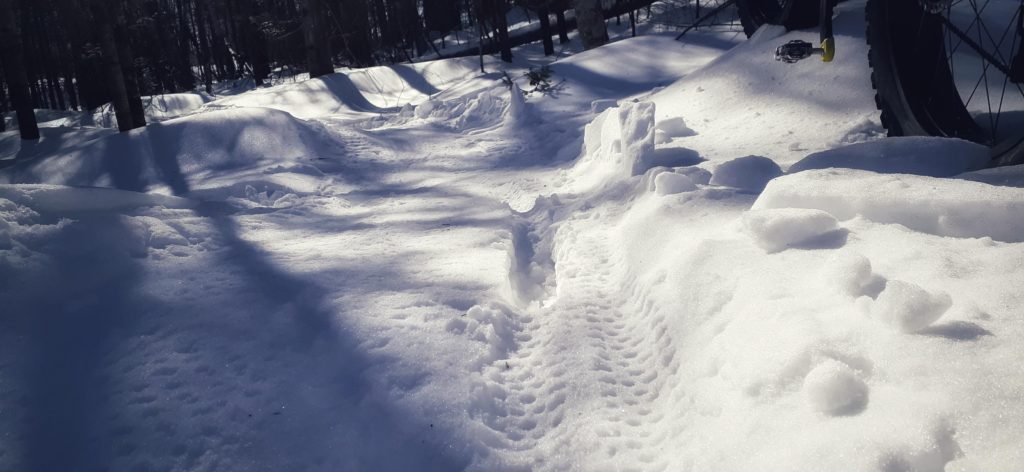
- You are riding (particularly climbing a hill) and you feel your back wheel slipping in loose snow.
- Your bike feels like its bouncing off every little divot and bump in the trail.
- The trail is icy and you are losing control.
- You are just barely breaking through a surface like a snow crust or leaving a small rut
(if letting air out doesn’t fix this it’s time to turn around and try coming back another day)
What about times when you might want to run a little more air?
- The trails are firm and in great shape. Look for this if it’s been 4-5 days since grooming with no new snow.
- You feel like you need to pedal in order to keep momentum going downhill.
- You feel your tire buckling/folding when taking corners or hitting a bump. Put air in now before you get a pinch flat!
(doesn’t apply to tubeless fat bikes)
If you do manage to get a flat tire on the trail it isn’t the end of the world if you are prepared, but it will suck. I often hike-a-bike back to my car if it is a short ride. If you are on a long ride you need 2 levers, a spare tube, a high-volume pump, and perseverance. You can substitute CO2 cartridges for the pump but plan on at least 2 high-volume units (not the kind you use to fill a puny little road bike tire). For my 4.6 tires I use tubes marked 2.5-2.7 on the box. They will stretch just fine and it saves a lot of space and weight in your pack.
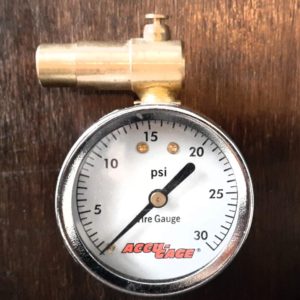
Most of what’s been said above relies on the feel and behavior of the tire. For those of you who’d like to put a little more science in the process you can obtain relatively inexpensive and good quality low-pressure air gauges. These specific gauges will give you a much better readout on pressures between 2-8 PSI. Most of the pressure gauges that come built into bike floor pumps won’t be readable in this range. There are some slick digital options available too. Check around the local bike shops.
A note on weather. As air temperature drops so does tire pressure. This normally isn’t a big deal. However, if you fill your tires inside a +20° house and then immediately go ride in – 20° cold you are going to drop at least 1 full PSI during your ride. If you ride in serious cold it’s best to consider that ahead.
One last tip on pressure – I never crank the dial louder than 12! Let me explain. Sometimes installing tires on the rim can be fussy and a little trick is to use high pressures to get the bead to snap in place. This can be especially true for fat bikes where the rim and tire tolerances between manufacturers can be wide. On a normal mountain bike it’s common to pump things up to 30-35 PSI until you hear the ‘ping’ that lets you know everything is all lined up. Do not do this with a fat bike. With the air volumes involved in a fat tire you should not exceed 11-12 PSI. You will blast the tire off the rim, destroying it in the process, potentially throwing a lot of money down the drain. You will also most likely suffer temporary hearing loss and possibly a small heart attack. Instead of high pressures get the rim mounting job done by spraying soapy water onto the tire bead liberally just before you inflate it.
Hope this helps. Go easy on me internet.
Chris